“Moneybookers” An Online Payment System.
খেয়াল করলাম Moneybookers (Skrill).,,.,.,.,.,., Moneybookers (Skrill) করে সবাই হুলস্থুল ব্যাপার আর অস্থির হয়ে যাচ্ছে।
অনেকেই না জেনে , না বুঝে Account খুলছে আর নানা ভূলের কারনে অনেকেরই ডলার নষ্ট হচ্ছে বা অনেকেই Online Account থেকে উইথড্র করতে পারছে না। তাই ভাবলাম ইনফর্মেশন সংগ্রহ করে Moneybookers (Skrill) এর ডিটেইল দিয়ে পোষ্ট লিখেই ফেলি ।
What is Moneybookers (Skrill) ? / মানি-বুকার’স কি?
Moneybookers (Skrill) একটা অনলাইন পেমেন্ট সিস্টেম। বিভিন্ন ব্যাংকের মত Moneybookers (Skrill) অর্থ লেনদেনের সুযোগ দেয় এবং মানি-বুকার’স আকাউন্ট থেকে ব্যাংকে অর্থ ট্রান্সফার করে উইথড্র করা যায়।
এ জন্য যে কোন ব্যংকে আপনার একটি আকাউন্ট থাকতে হবে ।
আপনি যদি পেপাল এর সাথে পরিচিত থাকেন তাহলে বুঝে নিন সেম।
Why to use Moneybookers (Skrill) / মানি বুকার’স কেন ব্যবহার করবেন?
বর্তমানে যারা অন-লাইন-এ কাজ করেন বা ফ্রিল্যান্সাররা ব্যাপকভাবে Moneybookers (Skrill) ইউজ করেন। বাংলাদেশে পেপাল না থাকায় আমাদের মধ্যে Moneybookers (Skrill) একচেটিয়াভাবে চলছে। মূলত Moneybookers (Skrill)র বহুরকম ইউজ থাকলেও আমাদের প্রধান ইউজ ওডেস্ক বা অন্যন্যা মার্কেটপ্লেসগুলো থেকে অর্থ উত্তোলন করা এবং সেই অর্থ আমাদের ব্যাংক একাউন্টে নিয়ে আসা।
How to get ready with Moneybookers (Skrill) ? / একাউন্ট রেডি করার স্টেপগুলো হল:
১) একাউন্ট তৈরি করুন
২) এড্রেস ভেরিফাই করুন
৩) ব্যাংক একাউন্ট এড করুন
৪) Moneybookers (Skrill) ইমেইল মার্কেটপ্লেসের উইথড্রয়াল মেথড হিসেবে এড করুন
৫) প্রথম ট্রানজেকশন করুন
৬) ব্যাংকে ডলার আসার পর ব্যাংক ভেরিফাই করুন
আপাতত এগুলোই হল মেইন প্রসেস।
কিভাবে Moneybookers (Skrill) এ একাউন্ট করবেন:
আপনি ফেসবুকে একাউন্ট নিশ্চই করেছেন? আমি ধরে নিচ্ছি আপনি ফেসবুকে এবং অন্যান্য সাইটে রেজিস্টেশন করেছেন। হ্যা সেম জিনিসটাই করতে হবে Moneybookers (Skrill) এ। সোজা skrill.com বা moneybooker.com বা এখানে এ যান এবং নতুন একটা একাউন্ট করে নিন। আমার মনেহয় স্ক্রীনশট দিয়ে একাউন্ট করে দেখানোর প্রয়োজন নেই।
সতর্কতা: খুব সতর্ক থাকবেন কারন ফেসবুকে ইনফরমেশন মিনিটে মিনিটে চেঞ্জ করা যায় কিন্তু Moneybookers (Skrill) এ যা দুস্পরিবর্তনীয়। তাই কোনভাবেই অন্তত নাম, ব্যাংক একাউন্ট নং ইত্যাদি ভূল দিবেন না। গুরুত্বপূর্ণ কাজে যেমন পাসপোর্ট, ভিসা, ব্যাংক, ন্যাশনাল আইডতে সবসময় একই নাম ব্যাবহার করুন। ভুল হলে হয়তোবা একবার পরিবর্তনের সুযোগ পাবেন কিন্তু সেটা অনেক বিড়ম্বনার। আজকাল অনেককেই দেখি একেকখানে একেক নামে রেজিস্টেশন করে, Moneybookers (Skrill) ব্যাংকনেম/ন্যাশনাল আইডি নেম এর হুবহু নাম দিয়ে রেজিঃ করুন। আরেকটি জিনিস নিজের জন্মতারিখ Moneybookers (Skrill) খুবই গুরুত্বপূর্ন তাই এটা ভূলে যাইয়েন না, এটা ভুলে যেয়ে বিড়ম্বনার পরেছে এরকম মানুষও আছে 
এড্রেস ভেরিফাই করুন:
Moneybookers (Skrill)র দ্বিতীয় কাজ হল এড্রেস ভেরিফাই করা, খুবই গুরুত্বপূর্ন কাজ, এড্রেস ভেরিফাই ব্যাতিত আপনাকে Moneybookers (Skrill) এককথায় কিছুই করতে দিবে না। আমি ধরে নিচ্ছি আপনি একাউন্ট রেজিস্টেশনের সময় নিখুতভাবে নাম এবং এড্রেস এন্ট্রি দিয়েছিলেন। এখন আপনি Moneybookers (Skrill) এ লগিন করে এড্রেস ভেরিফাই এর লেটার এর জন্য আবেদন করুন। ১৫-২০ দিন লাগে লেটার আসতে ততদিন অপেক্ষা করুন। লেটারটি হাতে পেলে লেটারে থাকা ইন্সট্রাকশন অনুযায়ী লেটারে উল্লেখিত কোডটি এন্ট্রি দিন তাহলে আপনার এড্রেস ভেরিফাই হয়ে যাবে। এড্রেস ভেরিফাই হল Moneybookers (Skrill) এর একটি গুরুত্বপূর্ন স্টেপ। এড্রেস ভেরিফাই করলে Moneybookers (Skrill) 3000-4000(আনুমানিক) ডলার/প্রতি ৯০ দিনে উইথড্র করতে দিবে। এই 3000-4000 ডলার হল আপনার উইথড্রয়াল লিমিট যা আরো ভেরিফাই এর মাধ্যমে বারানো যায়।
লেটার পান নি?
হ্যা অনেক অনেক অভিযোগ লেটার আসে নাই। চিন্তার কিছু নেই এরজন্যও বিকল্প ব্যাবস্থা আছে। লেটার দ্বিতীয়বার ইস্যু করা হয় না। তাই যদি লেটার না আসে তাহলে আপনাকে মেনুয়ালী ভেরিফাই করতে হবে। লেটার এর জন্য মিনিমাম ২৫ দিন অপেক্ষা করুন তারপর Moneybookers (Skrill) লগিন করে Email Support এ ক্লিক করে একটি ডিসপুট টিকিট খুলুন, টিকিটে বুঝিয়ে বলুন যে আপনি এড্রেস ভেরিফাই করার জন্য আকাঙ্খিত চিঠিটি পান নি এখন কিভাবে এড্রেস ভেরিফাই করবেন” আপনাকে ওদের সাপোর্ট থেকে দেয়া মেইলে কিছু ইন্সট্রাকশন দিবে কিভাবে আপনি আপনার এড্রেস মেনুয়ালী ভেরিফাই করবেন। সাধারনত Moneybookers (Skrill) কিছু পেপারস চায় যেমন Government Issued photo ID, Utility bill (within last 6 month), Bank Statement (Within last 6 month) ইন্সট্রাকশনে চাওয়া পেপারস স্ক্যান করে মেইলে দেয়া ইন্সট্রাকশন অনুযায়ী আপলোড করে দিন। এখানে উল্লেখ্য যে রেজিস্টার করা এবং পেপারস এর ঠিকানাও হুবহু মিল থাকাটাই সবথেকে ভাল তবে যদি সামান্য অমিল থাকে তাহলে ওদের সাপোর্টে একটু কড়া রংঙের যুক্তি দিলেই কাজ হয়ে যাবে। আশাকরি ভালভাবেই মেন্যুয়ালী ভেরিফাই হয়ে যাবে। আশাকরি ভালভাবেই মেন্যুয়ালী ভেরিফাই হয়ে যাবে। একান্তই যদি অমিল থাকে তাহলে হালকা ফটোশপে হাত দিতে পারেন তবে সেটা অবশ্যই নিজ দায়িত্বে!
এবার ব্যাংক এড করুন:
এড্রেস ভেরিফাই করার লেটার ইস্যু করার পরই আপনার কাজ হল একাউন্টে ব্যাংক একাউন্ট এড করা। ব্যাংক এ্যাকাউন্ট এড করার জন্য আপনানে সার্ভিস প্রদানকারী ব্যাংকটির Swift code জানতে হবে। কোডগুলি পাবেন http://www.theswiftcodes.com/bangladesh এই লিংকে। কোড গুলিতে লক্ষ করুন অনেক ব্যাংকেরই ব্রাঞ্চকোড আছে (সুইফট কোডের একটা তালিকা ওডেস্ক হেলপ গ্রুপের ডকুমেন্টেও আছে) । আপনি যদি আপনার শাখাটির জন্য আলাদা কোড পান তাহলে সেটা এড করুন, অন্যথায় কোডের শেষে থাকা নিউমেরিক অংশ বাদে বাকিটুকু এড করুন, চিন্তার কোন কারন নেই। তবে ব্রাঞ্চকোড দিতে পারলে অর্থ দ্রুত আসার নিশ্চয়তা থাকে মাঝে মাঝে। এবং আরেকটি সুবিধা হল নিজের কাছের ব্রাঞ্চ থেকেই সেবা নেয়া যায়। না থাকলে মূল কোডই ইউজ করুন। উদাহারনস্বরুপ ডাচ বাংলা ব্যাংকের NABABPUR BRANCH এর কোড হল3 DBBLBDDH104 দেখা গেল আপনার নবাবপুর শাখাতে একাউন্ট নেই অন্যশাখাতে আছে তাহলে আপনি এভাবে DBBLBDDH এড করতে পারেন। এখানে বলে রাখা ভাল যে আপনি যদি নবাবপুর এর কোড দিয়েও ব্যাংক এড করেন তাও আপনি টাকা পাবেন কারন অনলাইন ব্যাংকিং। যাহোক কোডটি এন্ট্রি দিলে আপনার ব্যাংকের নাম শো করবে তারপর আাপনি আপনার ব্যাংক একাউন্ট নম্বরটি এন্ট্রি দিন, এখানে উল্লেখ্য যে আপনার একাউন্ট নং যদি হয় এরকম 137.436.76846 তখন ‘.’চিন্হগুলো বাদ দিয়ে লিখুন 13743676846 এভাবে। ব্যাস ব্যাংক একাউন্ট এড করা হয়ে গেল। উল্লেখ্য অনেকে বলে আমার একাউন্ট নম্বর দুইটা একটা ছোট আরেকটা বড়,এটার ব্যাপার হল আপনি যেটাই এন্ট্রি দেননা কেন টাকা উইথড্র হবে সমস্যা নাই,নতুন পুরাতন মিশিয়া বহুদিন ধরে ব্যাবহার করছি কোন সমস্য নাই।
চরম সাবধানবানী: Moneybookers (Skrill) আর আপনার ব্যাংক একাউন্টে যদি নামের একটি অক্ষরেরও ভিন্নতা থাকে তাহলে বিরত থাকুন উইথড্র দিতে। নামের ভিন্নতা থাকলে Moneybookers (Skrill) এ টিকিট খুলে নাম ঠিক করে নিন। তবে নাম কিন্তু একবারই চেঞ্জ করতে পারবেন তাই খুব সাবধান। আপনার এই ভূল আপনার কাছে ছোট মনে হলেও Moneybookers (Skrill) সেটাকে Money Laundering বা Hacking ভাবতেই পারে!
এছাড়াও অনেকে দেখি নিজের Moneybookers (Skrill) থাকে প্রিয়জনের একাউন্টে উইথড্র রিকুয়েস্ট করে ফেলেছে। ভূলেও এরকম কাজ করবেন না তাহলে চিরতরে একটা ঝামেলায় পরে যেতে পারেন। আরও একটি ব্যাপার জেনে রাখ ভাল যে Moneybookers (Skrill) আপনাকে দ্বীতিয় কোন একাউন্ট করতে দিবে না কোনভাবে করলেও যদি ওরা বুঝতে পারে তাহলে সব যাবে।
কোন ব্যাংকে একাউন্ট করব?:
অনেকেই বলবেন যে কোন ব্যাংকে একাউন্ট করলে ভাল হবে, আমি নিজের কথা বলি DBBL, BRAC, IBBL সহ কয়েকটা ব্যাংকে আমার একাউন্ট থাকলেও আমি ডাচকেই সবথেকে রিকমেন্ড করি। ডাচে একটি স্টুডেন্ট একাউন্ট খুলে নিন যা পুরো ফ্রি এবং বাৎসরিক ফি মুক্ত। যাদের ইনকাম কম তাদের জন্য ডাচ বেস্ট তবে যাদের ইনকাম বেশি এবং ঢাকাতে থাকেন+দ্রুন টাকা দরকার হয় তারা ব্রাকে খুলতে পারেন। ডাচের সুবিধা হল সারাদেশেই আছে। স্টুডেন্ট একাউন্টে ডাচের মাসে 45 হাজার টাকা লিমিট থাকলেও রেমিটেন্সে এই লিমিট আরোপ করা হয় না তাই মানে আপনার ফ্রি একাউন্টে 10 লাখ টাকা আনলেও ওরা মাইন্ড খাবে না বরং আপনাকে আদরই (অতিতে পেয়েছি কিনা!) দিবে।
আপনার উইথড্র মেথড এড করুন মার্কেটপ্লেসে:
আপনার মোবাইলে ফ্লেক্সিলোড এর মাধ্যমে রিচার্জ করতে গেলে যেমন আপনার মোবাইল নম্বরটি লাগে তেমনি Moneybookers (Skrill) এ ডলার ঢুকাতে আপনার Moneybookers (Skrill) এ এড করা ইমেইল এড্রেসটি লাগবে। এড্রেসটি নিশ্চই আপনার মনে আছে এখন আপনি আপনার মার্কেটপ্লেসে লগিন করুন এবং Withdrawal Method হিসেবে ইমেইল এড্রেসটি এড করুন। মেথড সক্রিয় হতে ওডেস্ক ৩ দিন সময় নেয়।
এখানে যে সমস্যাটা হয় তাহল ওডেস্ক দুটা মেইল উইথড্রয়াল মেথড হিসেবে এড করতে দেয় একটা হল @odesk.com আরেকটা হল আপনার মেইল যেটা দিয়ে ওডেস্কে রেজিস্টার করেছেন। দেখা গেল আপনি Moneybookers (Skrill) এই মেইল ইউজ না করেই রেজিস্টার করেছেন। সেক্ষেত্রে আপনার ওডেস্কে সংযুক্ত দুটা মেইলের যেকোন একটাকে সক্রিয় করুন মেথড হিসেবে এবং তারপর সেটাকে Moneybookers (Skrill) এ এড করে নিন ব্যাস কাজ শেষ।
প্রথম Withdraw:
খুবই ভালভাবে কাজগুলো সমাপ্ত হয়েছে এখন অপেক্ষা উইথড্র দেবার। ওডেস্কের Wallet থেকে উইথড্র করুন মুহুর্তেই ডলার Moneybookers (Skrill) এ চলে যাবে (যদিও সময় এর কথা বলা থাকে 2 ঘন্টা)। Moneybookers (Skrill) এ লগিন করুন হিস্ট্রিতে আপনার ডলার ডিটেইল দেখতে পাবেন। এবার Moneybookers (Skrill)কার থেকে উইথড্র দিন। Moneybookers (Skrill)কার থেকে উইথড্র দেবার সময় ব্যাংক একাউন্ট সিলেক্ট (যদি একাধিক ব্যাংক একাউন্ট এড করে থাকেন) করুন যেটাতে উইথড্র দিতে চাচ্ছেন। তারপর উইথড্র প্রসিড করুন পরবর্তী স্টেপে আপনার জন্মতারিখ এন্ট্রি দিতে বলবে এই জন্মতারিখই আপনার ভেরিফিকেশন পিন। এইতো এরপর একটি মেইল পাবেন। Moneybookers (Skrill)কার থেকে ডলার ব্যাংকে পাঠানোর পর আরেকটি মেইল পাবেন দ্বীতিয় মেইলটি পাবার পর ডাচে আসতে সময় লাগে মোটামুটি 4-6 দিন, ব্রাকে 2 দিন ইসলামী ব্যাংকেও 2-4 দিন মত। সময়মত ব্যাংকের একাউন্টে টাকা যোগ হয়ে যাবে তারপর কার্ড দিয়ে বা চেক দিয়ে টাকা তুলতে পারবেন।
ব্যাংক একাউন্ট ভেরিফাই করা:
প্রথম উইথড্র করার পর আপনার প্রথম কাজ হল ব্যাংক একাউন্ট ভেরিফাই করা। যদি এড্রেস ভেরিফাই করা থাকে তাহলে ব্যাংক একাউন্ট ভেরিফাই করা বাধ্যতামূলক নয়। এখন দেখি কিভাবে কোন ব্যাংক একাউন্ট ভেরিফাই করতে হয়।
Moneybookers (Skrill)কার ব্যাংক একাউন্ট ভেরিফাই করার জন্য গত তিনমাসের মধ্যে কোন ব্যাংক ট্রানজেকশন এর ডিটেইলস দিতে হয়, তবে সেই স্টেটমেন্টে কত ডলার উইথড্র করেছিলেন সে এমাউন্টের উল্লেখ থাকতে হয়। এখানে সমস্যা হল ডাচের স্টেটমেন্টে এই এমাউন্ট উল্লেখ থাকে না। ব্রাকে বা IBBL এর হার্ড এবং অনলাইন স্টেটমেন্ট এ ডলার এমাউন্ট উল্লেখ থাকে, তাই এগুলোতে ভেরিভাই করা কোন সমস্যা না সমস্যা হয় ডাচে।
ডাচ বাংলা ব্যাংক এর একাউন্ট ভেরিফাই করা:
আপনাকে আপনার ব্রাঞ্চে যোগাযোগ করতে হবে এবং ব্রাঞ্চের যদি রেমিটেন্স প্রসেস করে তাকে ব্যাপারটা বুঝিয়ে বলুন যে আপনার রিসেন্ট হওয়া SWIFT ট্রানজেকশনের পেপারসের সাথে Moneybookers (Skrill)কার একটি ভেরিফিকেশন পিন পাঠিয়েছে সেটা দেবার জন্য। মাথামোটা ডাচ বাংলার পাবলিকরা প্রথমে বুঝবে না এটাই স্বাভাবিক। ওদের ভালভাবে বলুন মতিঝিল (ফরেন একচেঞ্জ) ব্রাঞ্চ এই প্রসেসগুলো ম্যানেজ করে। ওদের একটু বুঝিয়ে পিনটি কালেক্ট করুন তারপর Moneybookers (Skrill) এর ইমেইল সাপোর্টে পিনটি দিয়ে মেইল করুন।
BRAC:
এ ব্যাংকে ভেরিফাই করা সবথেকে সোজা, প্রথমে আপনাকে একটি স্টেটমেন্ট এর কপি লাগবে, iBanking এ লগিন করুন এবং রিসেন্ট ট্রানজেকশন সহ একটি স্ক্রীনশট নিন এবং পিসিতে সেভ করুন। যাদের অনলাইন ব্যাংকিং একটিভ নাই তারা ব্যাংকে যেয়ে একটি ব্যাংক স্টেটমেন্ট প্রিন্ট করে আনুন। এবার Moneybookers (Skrill) এ লগিন করে Email Support এ যেয়ে আপনি একাউন্ট মেনুয়ালী ভেরিফাই চাচ্ছেন তা জানিয়ে একটা মেইল করুন ফিরতি মেইলে আপনাকে জানিয়ে দিবে কিভাবে কোথায় আপলোড করতে হবে।
পুরো প্রসেসটি শেষ হতে একটু সময় লাগবে কারন Moneybookers (Skrill) সাপোর্ট একটু স্লো বটে চিন্তার কিছু নেই, আপনার Moneybookers (Skrill) পার্সোনাল একাউন্ট এখন রেডি টু ইউজ।
যাহোক চেষ্টা করলাম সবার জন্য কিছু করতে। আশাকরি আপনাদের উপকার হবে। কারও কাজে লাগলেই আমার চেষ্টা সার্থক।
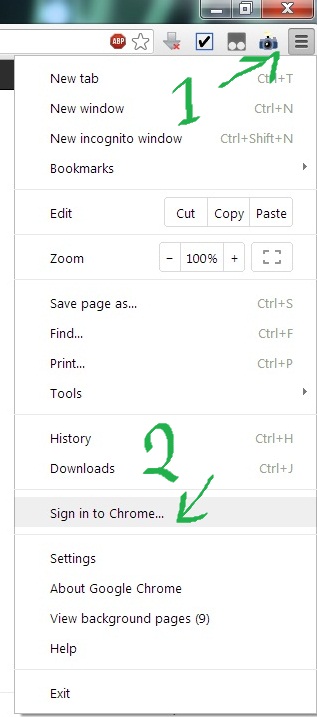
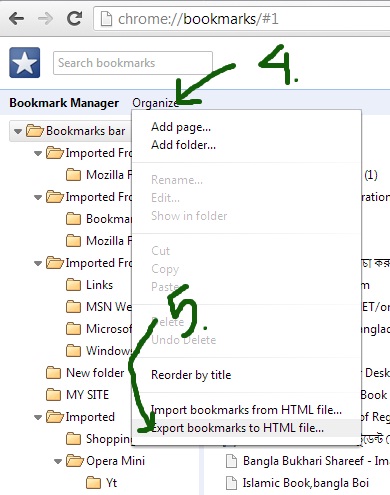
To view my next post Click on View Bangla font in Opera Mini